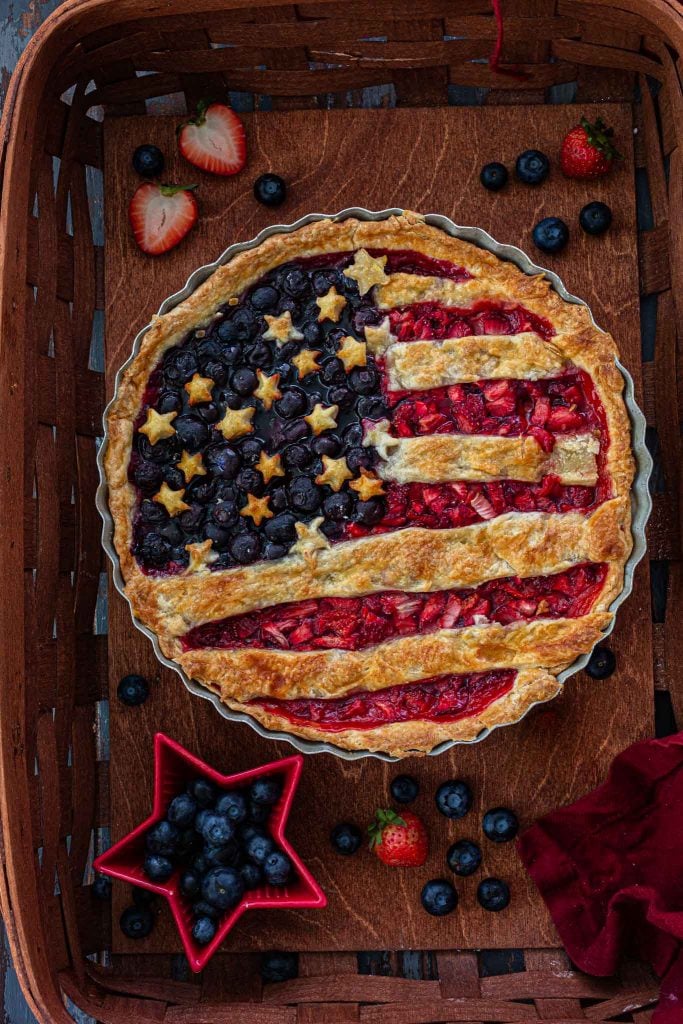
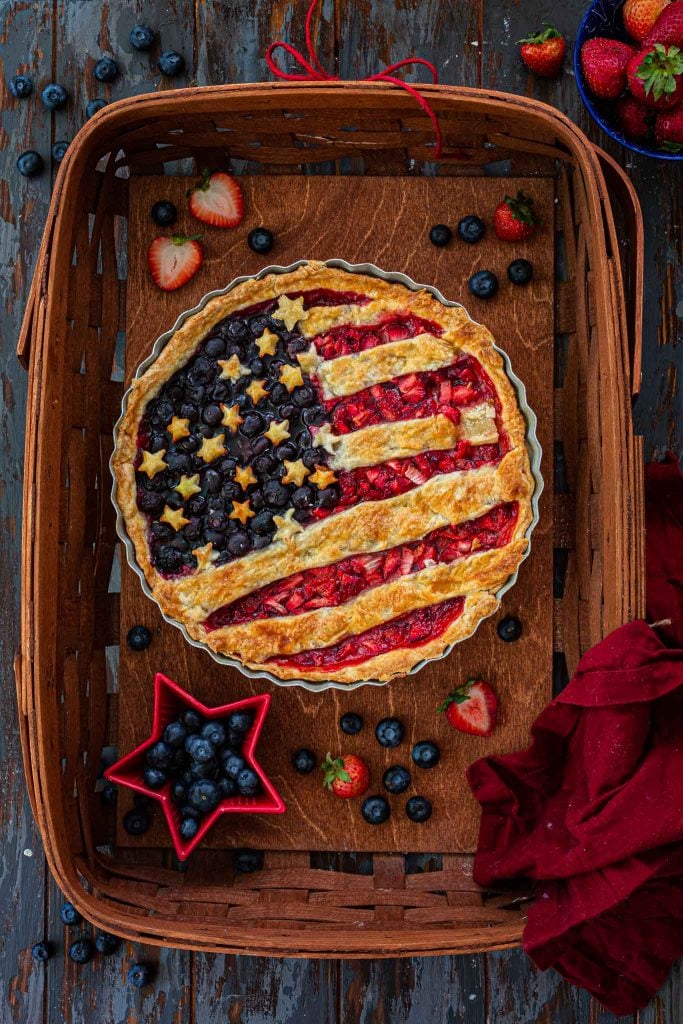
American Flag Berry Pie

Nothing says summer like a delicious berry pie! And if you’re making it for 4th of July (or Memorial Day), why not do an American Flag lattice to celebrate? I can’t think of anything more patriotic!
For more Red White and Blue inspiration, check out my American Flag Cake, Patriotic Red Velvet Cupcakes and Berry Pavlova.
Homemade Berry Pie is Summer Comfort Food!
Happy 4th of July!
I got way too excited making this American Flag Pie, aka Stars and Stripes Pie, aka Old Glory Pie, aka Patriotic Pie.
Whatever you call it, it is a fun dessert to serve for summer patriotic celebrations, like today (Fourth of July), Memorial Day and Flag Day.
But the reason I was looking forward to post this festive berry pie recipe today is because I’m celebrating my 10 year anniversary of moving to the United States!
Oh, how time flies! Ten years ago, in June, I packed my bags and said goodbye to my parents in the airport – my dad crying like a baby – to follow my dreams.
It turns out America knew me better than I knew myself. It said: “No, you don’t want to be an actor!”, and gave me a career in food publishing and a beautiful family instead.
So, happy birthday, America! I am proud to call you home.
In this post you will learn:
- What ingredients go in this American Flag Berry Pie
- What is the best thickener for fruit pies
- How to make this Patriotic Pie
- Serving suggestions
- If frozen berries can be used instead of fresh
- Frequently asked questions
Plus a printable recipe.
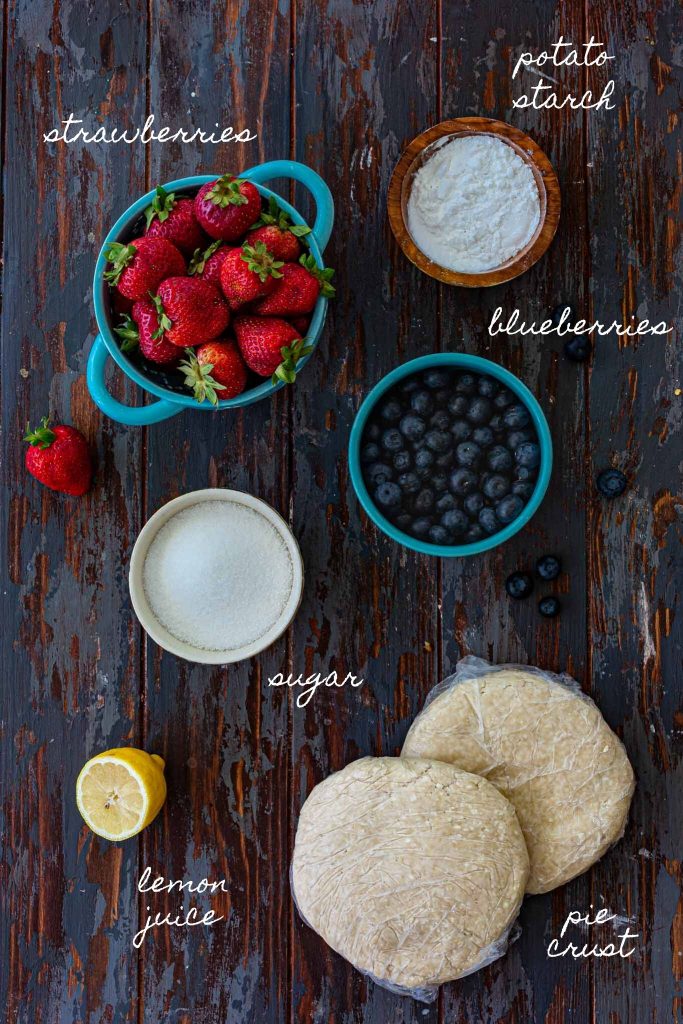
INGREDIENTS
You’ll only need a handful of ingredients to make this American Flag pie:
BERRIES – Something red and something blue, for the flag colors. I’m using blueberries and strawberries, but you could use blackberries and raspberries (or even cherries) instead!
SUGAR – Sugar helps the berries release extra liquid before we add them to the pie crust.
LEMON JUICE – A touch of lemon juice not only enhances the berries’ flavors, but helps preserve the beautiful bright colors of this pie.
POTATO STARCH – My favorite pie filling thickener!
PIE CRUSTS – Use a recipe that yields two crusts. We will need one to make the stars and stripes.
What is the best thickener for berry pie?
The million-dollar question! Ask 100 bakers and you will have 100 different answers.
Okay, maybe not 100. But at least 3: flour, cornstarch and tapioca flour.
Well, I’m adding another one to the mix. Potato starch!
First, let’s talk about how thickeners work. Heat causes the starches in the thickeners to bond with the liquid that you used in the pie filling (like lemon juice and the natural liquids of the berries) and they begin to swell, forming a more stable structure.
So, the truth is that all of the thickeners mentioned above will work. The difference is how they look and taste, the temperature at which they will begin to thicken, and how long they hold their structure after baking.
The reason I like potato starch the best is because it has a mild flavor, so it doesn’t overpower the berries. It also thickens well at moderate temperatures and produces clear and luscious results!
If you can’t get on hands on potato starch, you can use cornstarch instead, but the juices will be cloudier and it might also give the filling a starchy taste.
How to make American Flag Berry Pie
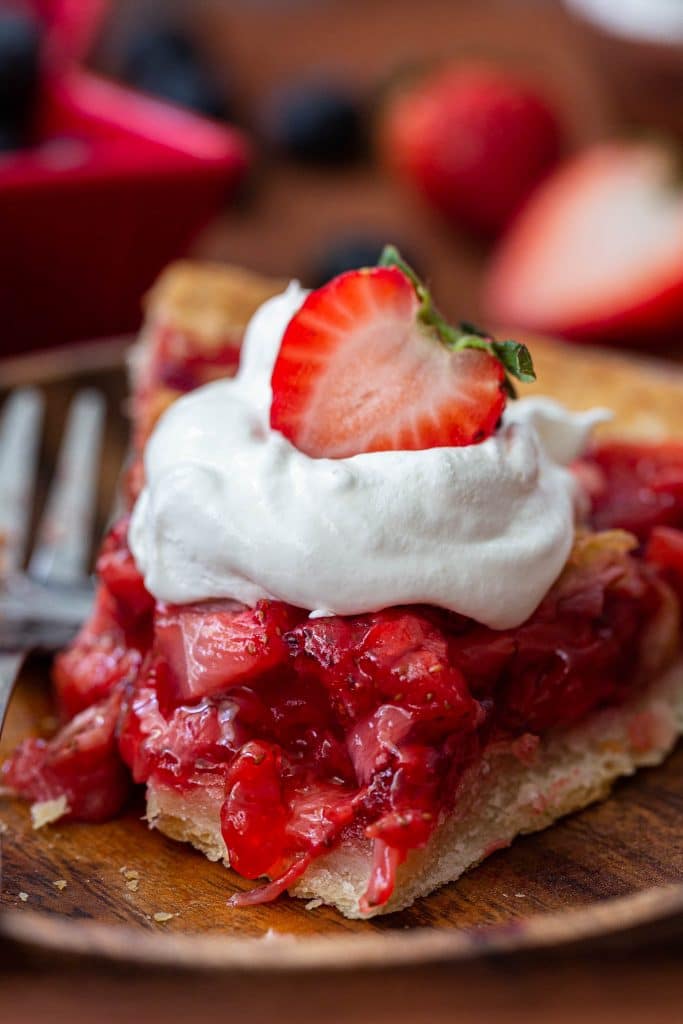
Fresh, bright and with just the right amount of sweetness, this berry pie recipe is easy to make and won’t require cooking the filling before baking!
A few tips before we begin:
- Don’t be intimidated by the flag design! You don’t need to be crafty or any special equipments (like a ruler). A few stars and some dough strips – even if they are crooked like mine) give the idea of the flag and a cool rustic look!
- A pastry mat, while not necessary, makes it easier to roll the crust to the right diameter.
- Don’t overwork the dough or your crust will be tough instead of flaky and tender.
- When filling the pie crust, leave the extra liquid behind. We don’t want the crust to get soggy and the berries are already juicy enough!
- Don’t skip letting the pie cool for at least one hour before serving, so the juices can settle. Otherwise, the pie will fall apart when you cut it and will be quite messy!
Recommended tools: rolling pin, parchment paper, pie mat, pie dish, pastry wheel, star cutter (I like the size of the ones that come in a linzer cookie cutter set), crust shield.
Here’s how I make this American flag pie recipe. As always, you will find the printable (and more complete) version of the recipe at the end of this post!
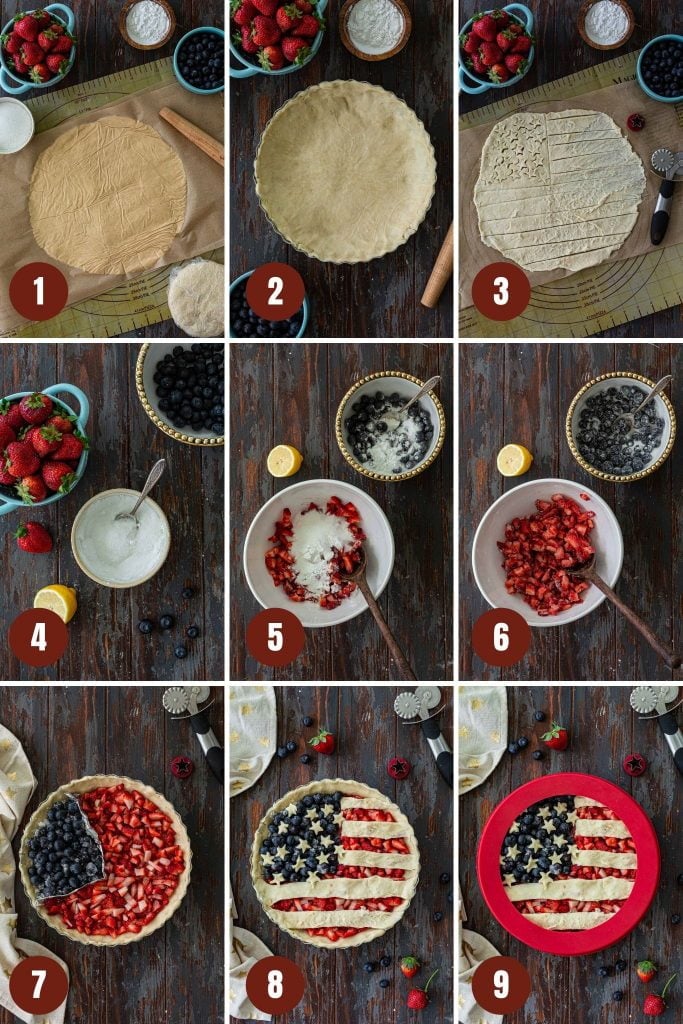
Step 1: Roll out the crusts
- Place one of the chilled dough discs in between two sheets of parchment paper. Roll out to a 12-inch circle. (Photo 1)
- Carefully peel the top parchment paper and place the dough into a 10-inch pie dish. Peel the other parchment paper sheet and gently press the dough into the bottom of the dish and up the sides. (Photo 2)
- Loosely cover with plastic and refrigerate while you work on the second crust.
Step 2: Cut the stars and stripes
- Roll the second chilled dough like you did the first.
- Use a pastry cutter, pizza cutter or sharp knife to cut stripes. Use a small star cookie cutter to cut the stars. I like to cut more than I’ll need, so I can choose the best looking ones later. (Photo 3)
- Place the stars and stripes on a parchment paper lined baking sheet, cover loosely with plastic and place it in the freezer while you prepare the filling.
Olivia’s Tip
Keep your second crust in the fridge while you work with the first one, so it doesn’t soften too much. You want the dough to still be cold when you cut the flag designs, or it will be sticky and very difficult to handle!
Step 3: Make the berry pie filling
- Combine the sugar and potato starch in a small bowl. (Photo 4)
- Place the strawberries in one bowl and the blueberries in another.
- Add 2/3 of the sugar/starch mix to the strawberries and the remaining to the blueberries. (Photo 5) Mix to combine.
- Add 1 teaspoon lemon juice to the strawberries and 2 teaspoons lemon juice to the blueberries. Mix until combined. (Photo 6)
Step 4: Arrange the “flag”
- Fold a piece of aluminum foil to form a thick strip. Place into the pie to block off a 90 degree wedge of the crust.
- Pile the blueberries inside the 90° wedge and the strawberries into the larger section. (Photo 7) Remove the foil.
- Remove the stars and stripes from the freezer and arrange on top of the pie: stars over the blueberries and stripes over the strawberries. (Photo 8)
- Brush the pie crust and decorations with egg wash, and sprinkle with sugar, if desired. Cover the edges with foil or a pie crust shield (Photo 9)
Step 5: Bake
- Place pie on a baking sheet and bake for 20 minutes at 400 degrees F.
- Remove the shield (or foil) and lower the heat to 375 degrees F. Bake for another 30 to 45 minutes, or until the filling is bubbly and the crust is golden brown.
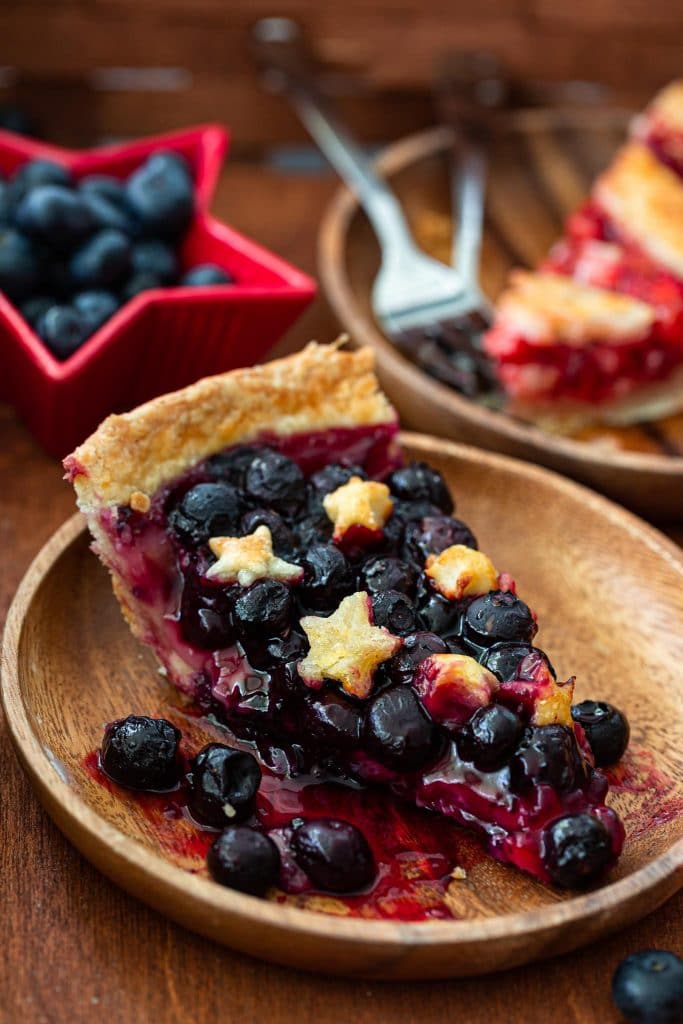
- Let the pie cool for at least one hour before serving.
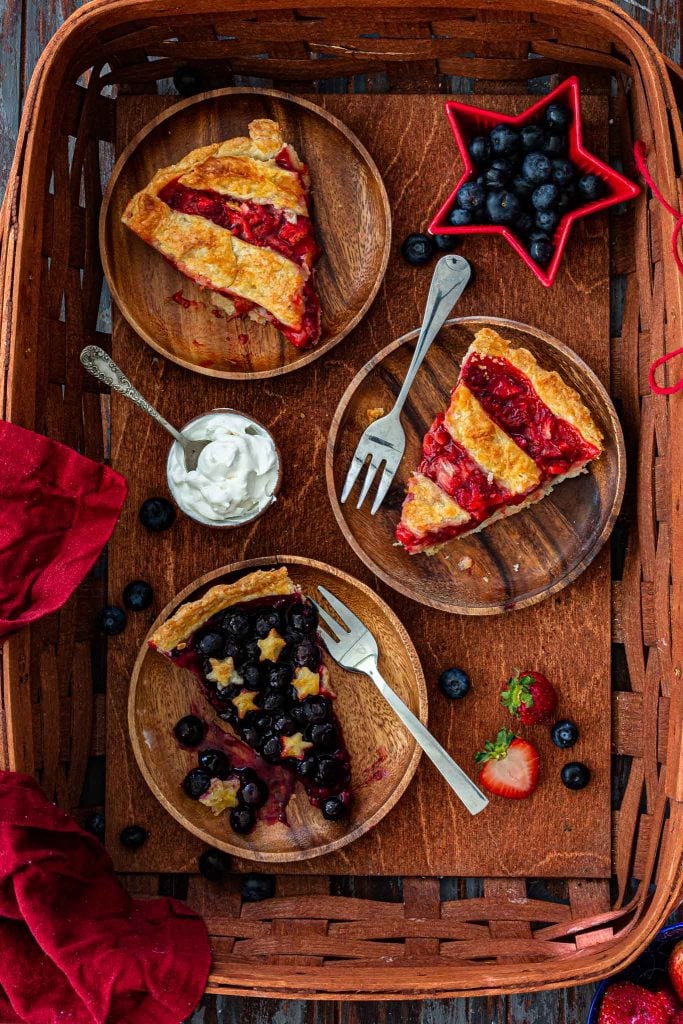
Serving Suggestions:
Vanilla Ice Cream? Homemade whipped cream? Both? Neither?
I guess it depends! If serving the pie at room temperature, at an outdoor cookout, I prefer serving with whipped cream.
But I would be lying if I said I didn’t warm leftovers (especially the blueberry part) to eat with ice cream!
Whatever you do, I don’t recommend serving this pie chilled. If taking it out of the fridge, let it come to room temperature to give the filling a chance to loosen up, and get silky and juicy again.

Can I use frozen berries instead of fresh?
Yes, you can make this pie with frozen berries, but you will need to thaw them first.
The pie might also need more time in the oven, about 10 to 15 minutes more. For that reason, you might want to skip the egg wash, or your crust might get too browned (aka kinda burned…).
BERRY PIE FAQs:
According to the USDA, fruit pies can be stored at room temperature for up to 2 days. For longer storage, you can keep it in the fridge (in an airtight container or covered) for up to 5 days.
Yes, you can freeze this berry pie for up to 4 months. Just make sure to allow it to cool completely and to wrap tightly (or store in a freezer bag) to prevent freezer burns.
When ready to serve, thaw at room temperature.
Did you make this recipe? I love hearing from you! Please comment and leave a 5-star rating below. You can also take a photo and tag me on Instagram with #oliviascuisine.

American Flag Berry Pie
Ingredients
- Double pie crust for a 9″ deep pie dish
- ⅓ cup potato starch
- ⅔ cup sugar, plus more for sprinkling
- 4 cups (600g) chopped strawberries
- 2 cups (200g) blueberries
- 3 teaspoons lemon juice, divided
- Egg wash: 1 egg + 1 tablespoon milk
Equipment
Instructions
- Roll out the first chilled pie crust into a 12-inch circle. Gently place the crust into a 9 or 10-inch deep pie dish, carefully pressing the dough into the bottom and up the sides. Refrigerate for 30 minutes.
- Preheat oven to 400º F with a rack in the middle.
- Remove the second crust from the fridge and roll into a 12-inch circle. Using a pastry wheel or pizza cutter, cut the dough lengthwise into stripes. Use a star cookie cutter to cut some stars. Place the designs on a parchment paper lined baking sheet, and freeze while you prepare the filling.
- In a small bowl, whisk together the potato starch and sugar. Reserve.
- Place the strawberries in a large bowl and the blueberries in a medium bowl. Add ⅔ of the sugar mixture to the strawberries and the remaining ⅓ to the blueberries. Mix with a spoon so the berries are coated with the mixture.
- Add 1 teaspoon of lemon juice to the strawberries and the remaining 2 teaspoons to the blueberries. Mix to combine. Let the berries sit for at least 5 minutes to release the excess liquids.
- Fold a piece of aluminum foil to form a thick and long strip. Place it into the pie dish, blocking off a 90° wedge of the crust. Spread the blueberries into that smaller section and the strawberries into the larger section. Carefully remove the foil, arranging the berries so they don’t invade each other’s spaces.
- Remove the flag designs from the freezer and arrange on top of the berries. The stars go over the blueberries and the strips over the strawberries.
- Make an egg wash by whisking one egg with 1 tablespoon of milk. Brush over the crust and designs. If desired, sprinkle the crust and designs with sugar.
- Cover the edges of the pie with a crust shield or foil.
- Place the pie on a baking sheet and bake for 20 minutes. Then, remove the shield and lower the heat to 375º F. Continue baking for 30 to 45 minutes, or until the filling is bubbly and the crust is golden brown.
- Remove the pie from the oven and let it cool for at least one hour before serving.