Brazilian Honey Cakes (Pão de Mel)

These out-of-this-world Brazilian Honey Cakes, aka Pão de Mel, are everything your sweet tooth could ask for. Spiced chocolate honey cakes, filled with dulce de leche and covered in chocolate! I can’t think of anything better than that!

A popular Brazilian dessert!
Chocolate-y, rich, dense, addictive, moist, fluffy, tastes like Brazilian childhood. I could write this whole post just by listing adjectives that describe these cakes!
But, don’t worry, I won’t. I’ll get to all the details so you can recreate them exactly like mine.
This recipe makes quite a lot – about 24 if you use the same size ramekins I used – but I figured it’d be okay, as most people will usually need a lot when making it for parties or to give as gifts. However, if you’re just making them because you are craving a chocolate snack, you can easily halve the recipe!
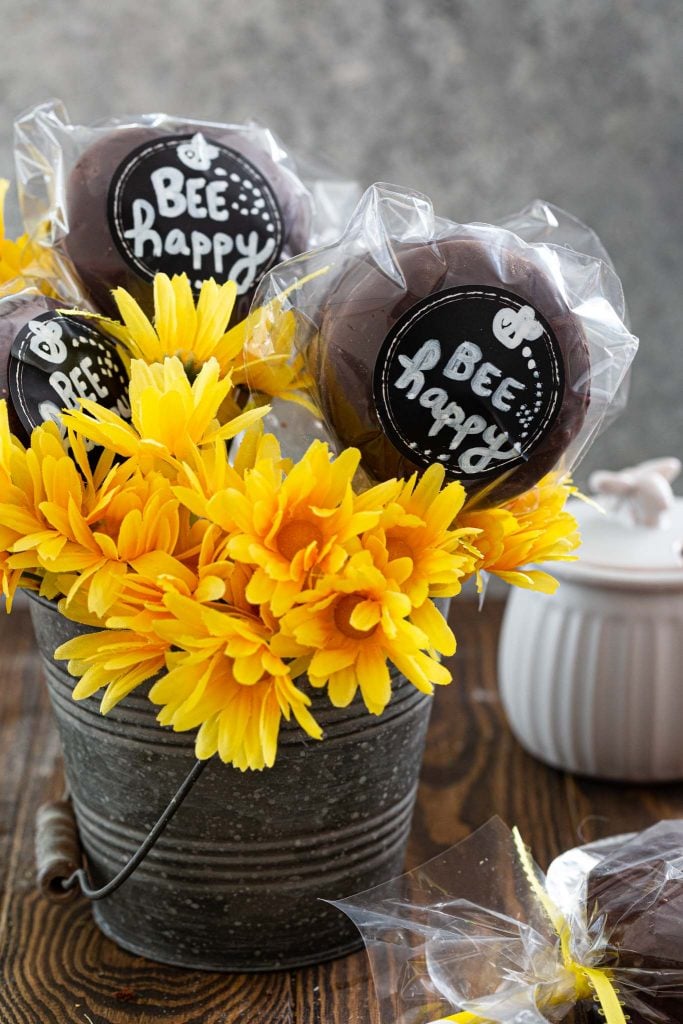
I last made these in August, as party favors for my daughter’s bee themed birthday. To say they were a success is an understatement! One of the texts I got from a friend, read “What insaneness is this?”.
Yes, they are a bit time consuming to make. But take it from a Brazilian: nothing says I love you like a homemade pão de mel!
What is Pão de Mel?
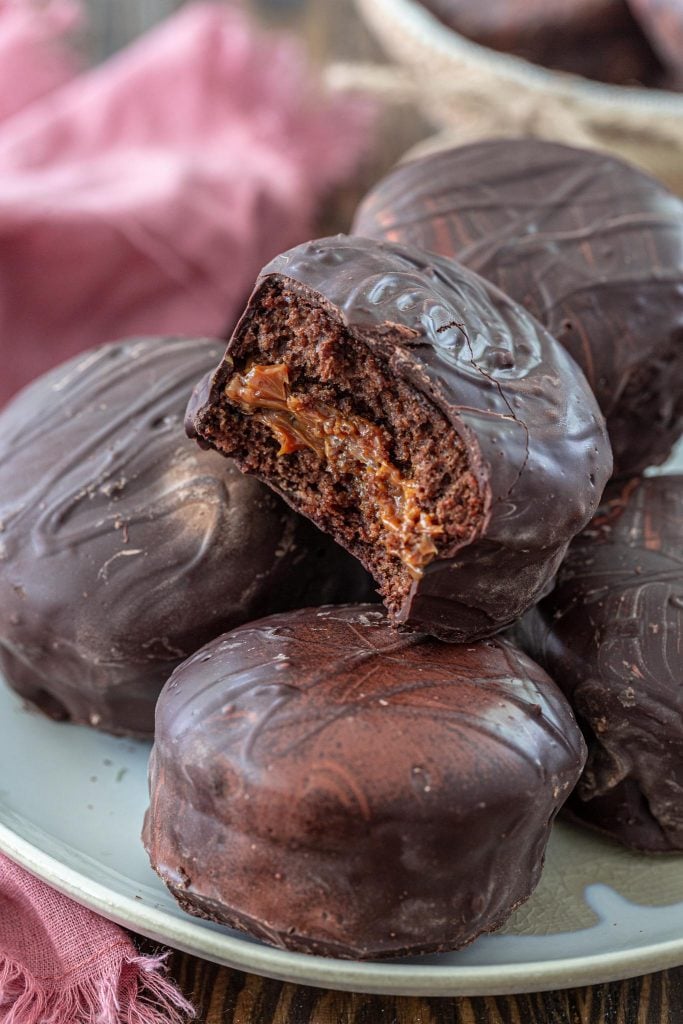
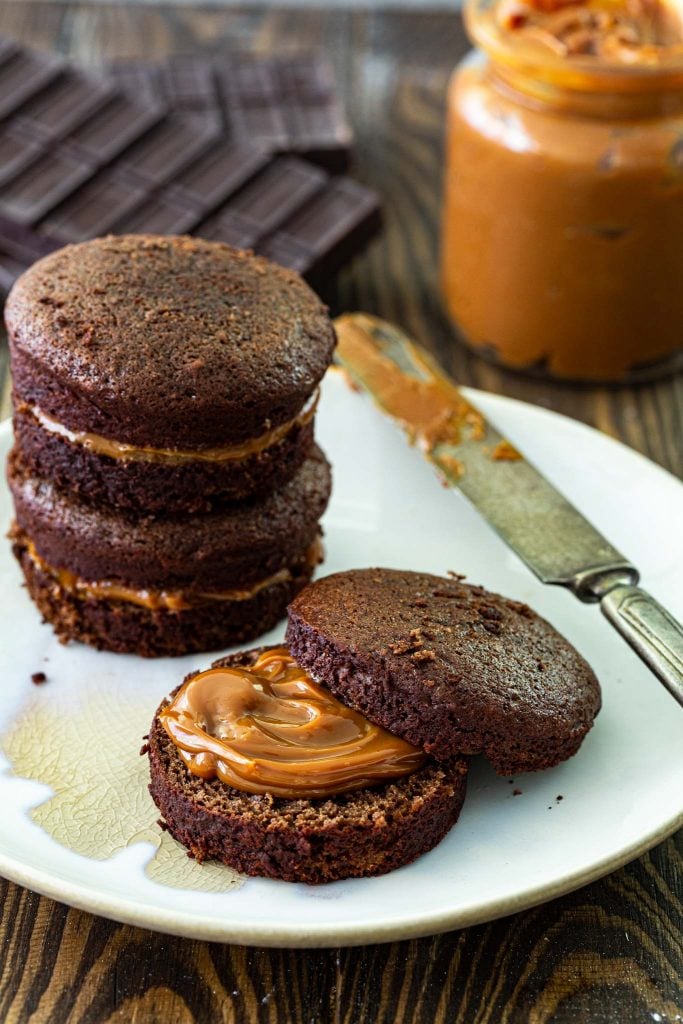
Pão de Mel is a popular Brazilian treat consisting of two layers of spiced chocolate and honey cake sandwiching a layer of filling (usually dulce de leche), often covered with chocolate.
Despite the name, you don’t really taste honey in these treats. The chocolate and spices are pronounced, almost like in a chocolate gingerbread cookie! The dulce de leche and the chocolate coating take these cakes to the next level, making them rich, indulgent and absolutely delicious.
The origins of these cakes are unknown, but there are two theories that make sense. The first claims that the Brazilian honey cakes are a spinoff of the Russian Pryaniki, a baked good made primarily from flour and honey. As the recipe passed among generations, it changed slightly according to the region, sometimes including other ingredients, like spices.
The second theory believes that the pão de mel originated in Europe, when Europeans discovered that covering spiced cakes in chocolate would keep them flavorful and moist for longer.
Russian or European, if you’re interested in Brazilian cuisine, Pão de Mel is a recipe you absolutely need to make!
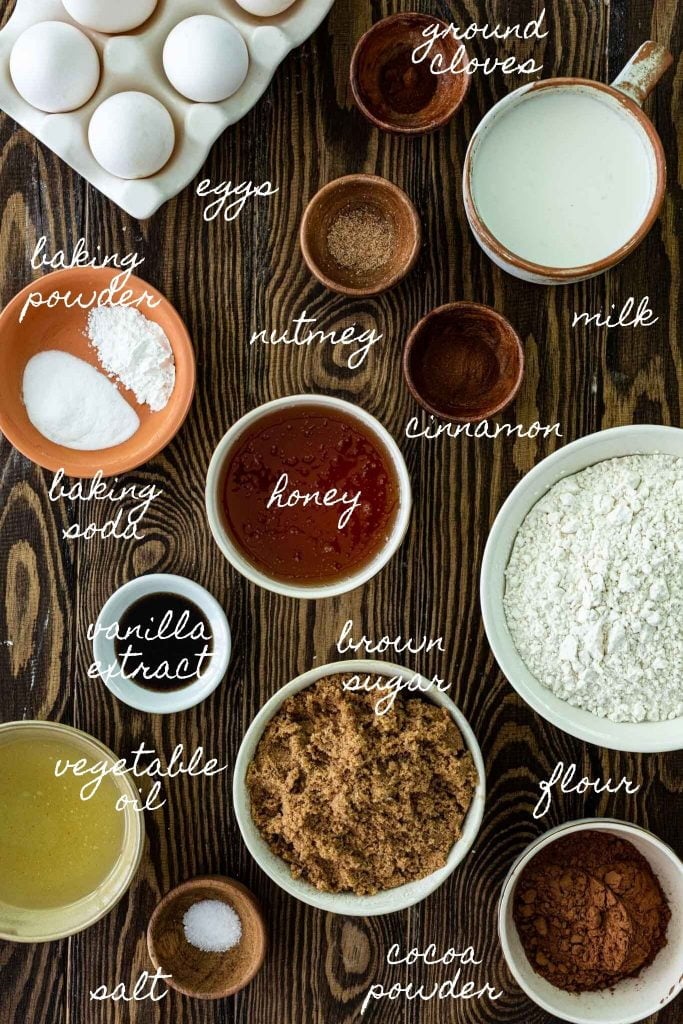
Ingredients for Brazilian Honey Cakes
Here’s what you’ll need to make the spiced honey cakes:
- Milk
- Spices – cinnamon, ground cloves, nutmeg
- Honey
- Eggs
- Salt
- Brown sugar
- Vanilla extract
- Vegetable oil
- All-purpose flour
- Cocoa powder – Dutch-process
- Baking powder
- Baking soda
You’ll also need dulce de leche for the filling and melted/tempered bittersweet chocolate to cover the cakes.
Equipment you’ll need:
- Blender
- A large bowl
- Whisk
- Ramekins
- Thermometer, for tempering
How to Make Brazilian Honey Cakes
While not difficult and easy to follow, this recipe can be a labor of love, especially if you choose to temper the chocolate.
Totally worth it, though! You will be making these again and again, to give as gifts or to eat as a snack!
Let’s start:

- Start by infusing the milk with the spices. Just combine the milk with the cinnamon, cloves and nutmeg in a saucepan, and bring to a simmer on the stove. Once simmering, turn off the heat, add the honey and cover to infuse.
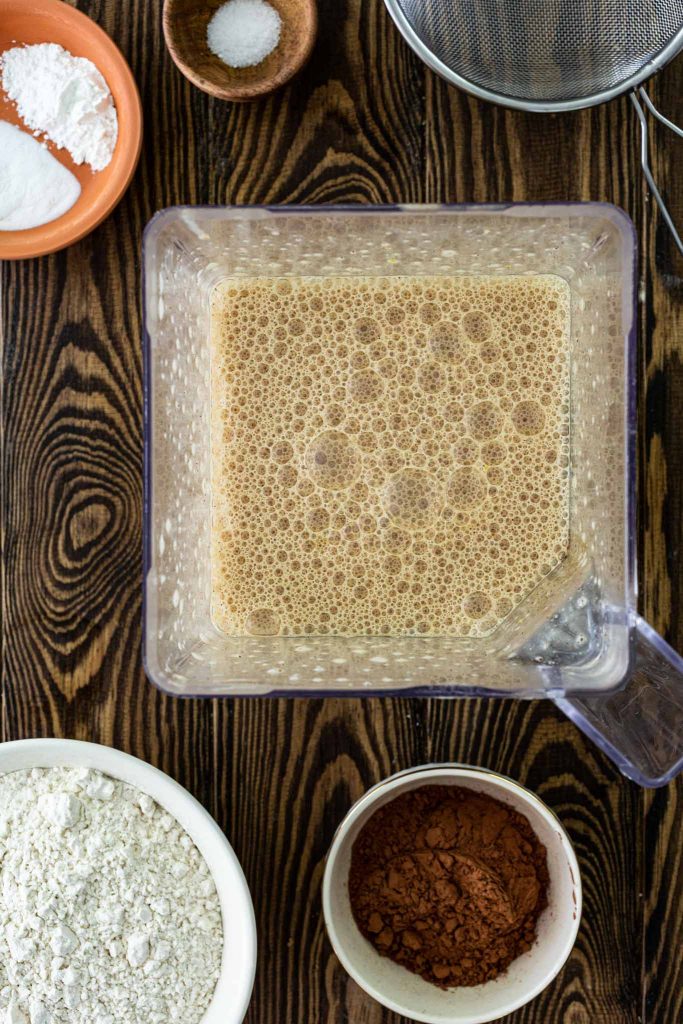
- Once the infused milk has cooled enough, transfer to the jar of a blender. Add the oil, eggs, brown sugar and vanilla extract. Blend until combined.
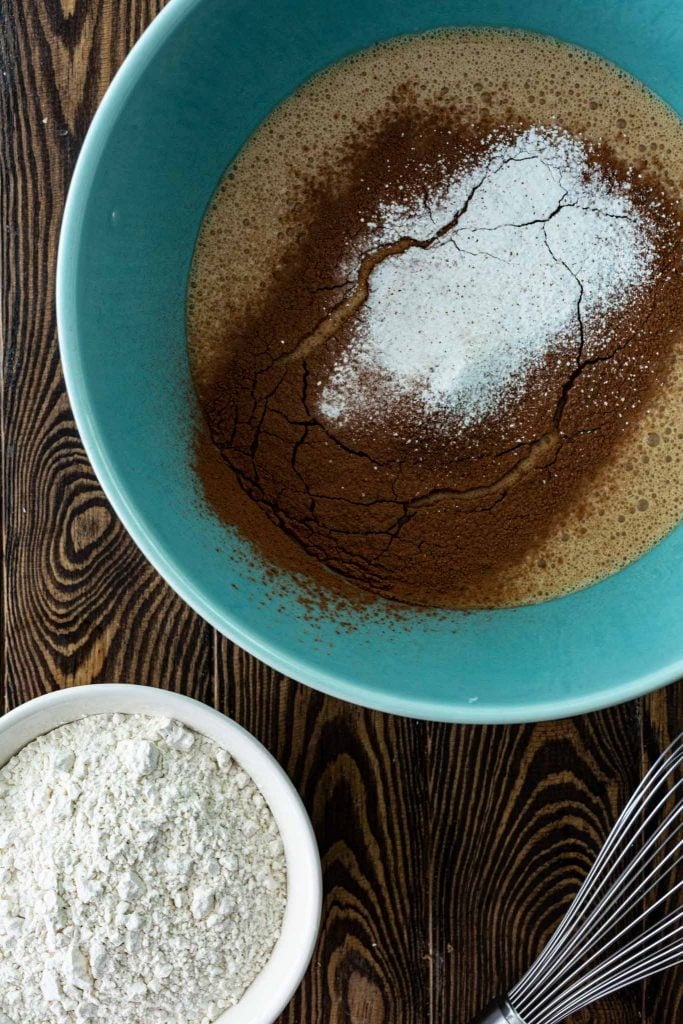
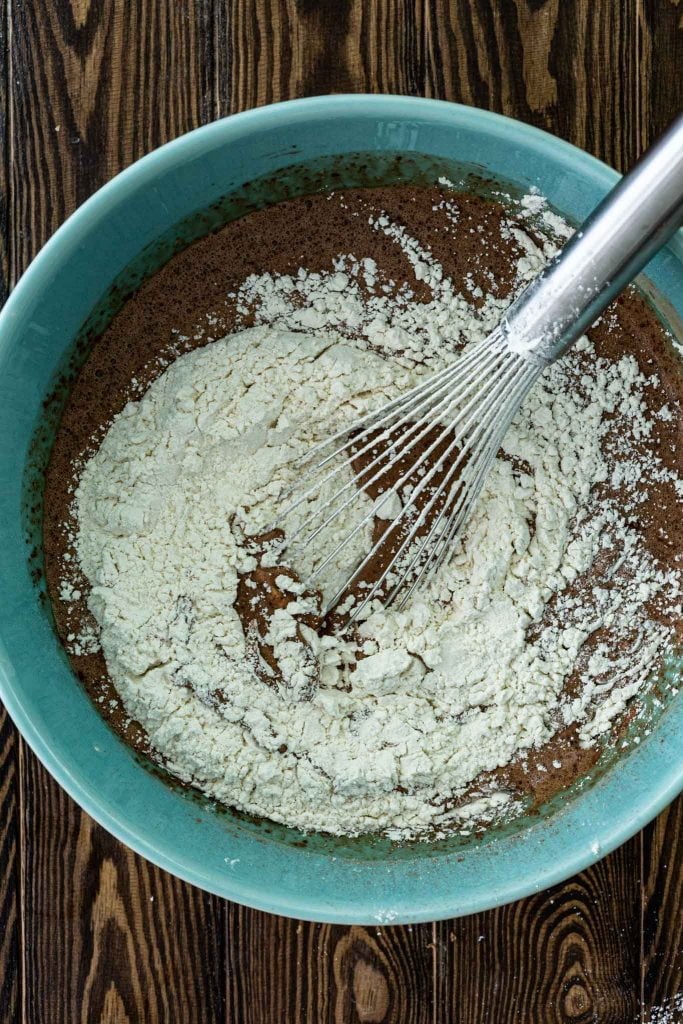
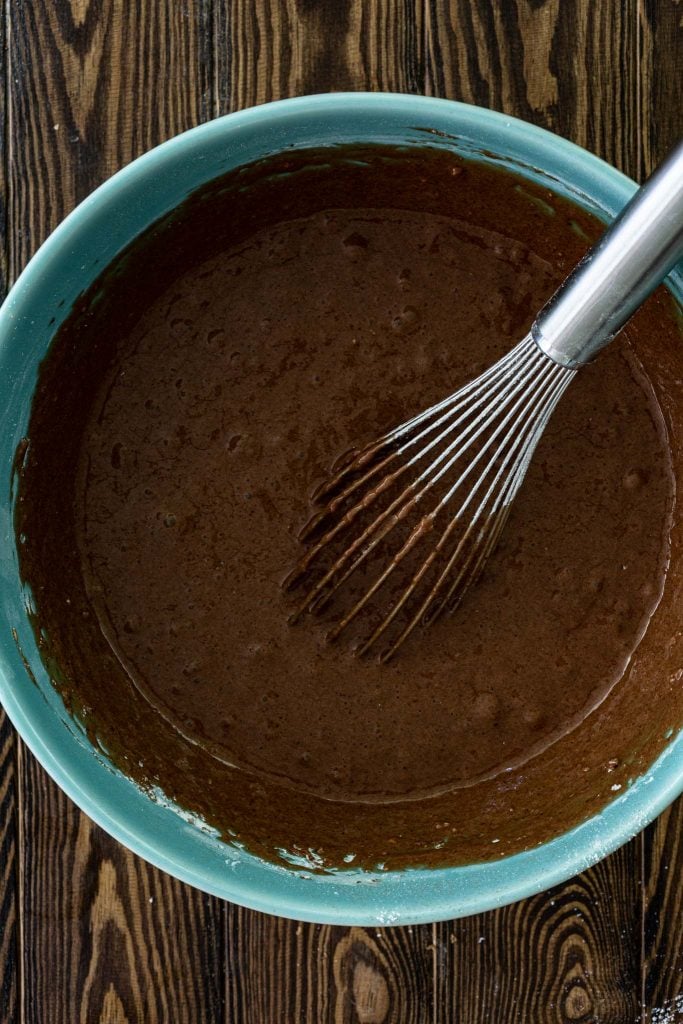
- Pour the liquid mixture into a large bowl and start adding the dry ingredients, making sure to sift them using a fine mesh strainer. Start by adding the cocoa powder, followed by the baking soda and baking powder, and finally the flour. Do not overmix! Biting pão de mel should be like biting into a cloud!
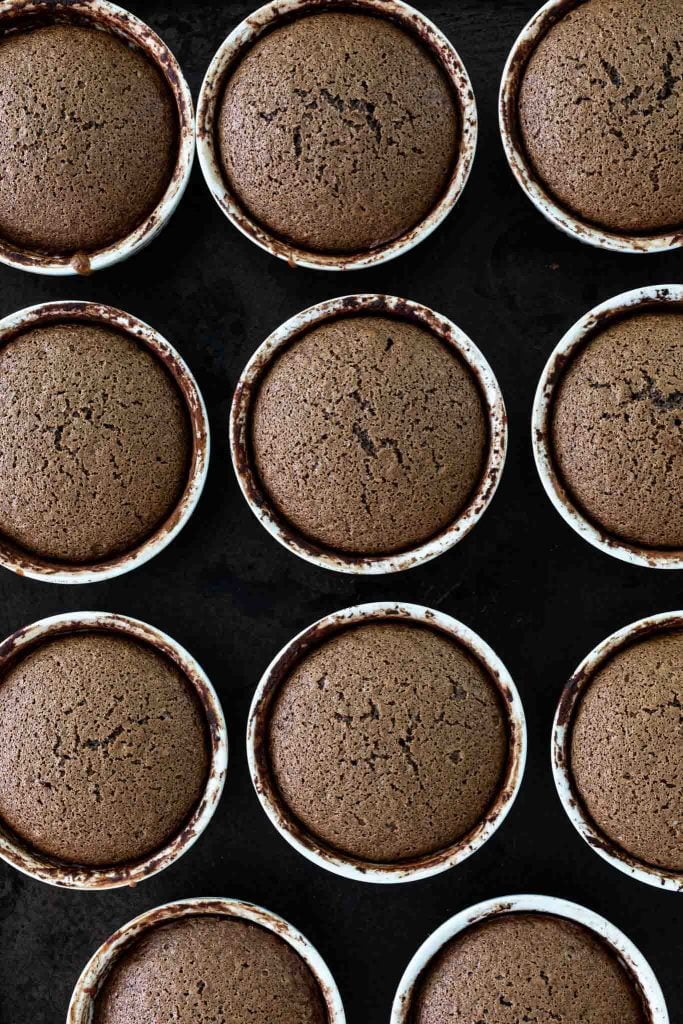
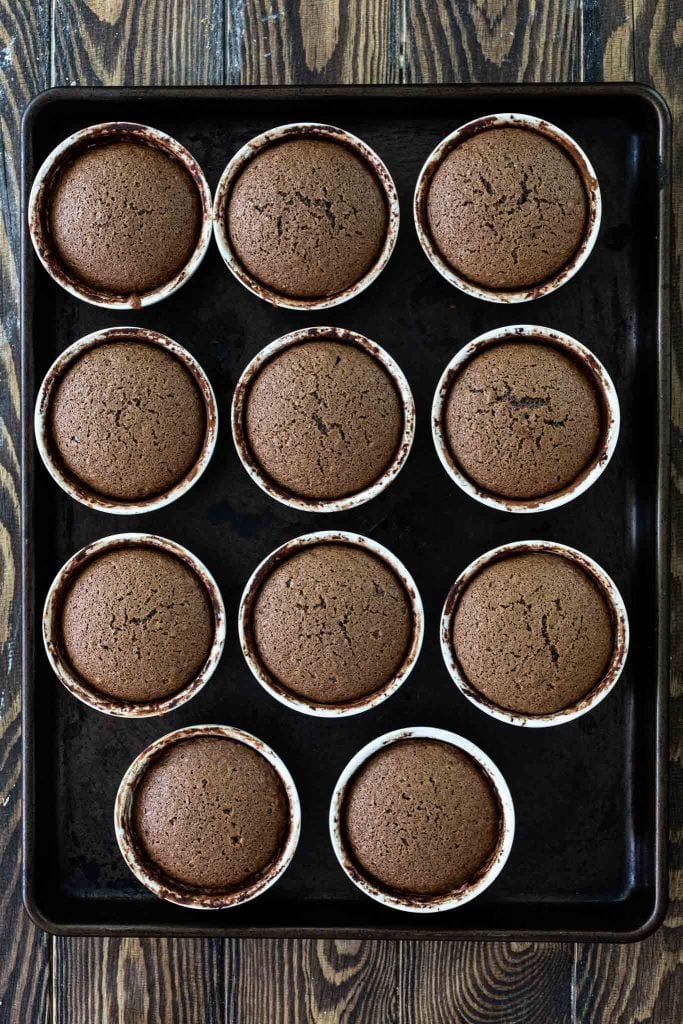
- Transfer the batter into prepared ramekins, filling halfway through as the cakes will rise.
- Bake in a 350 degrees F oven for about 15-20 minutes, or until a toothpick inserted in the middle of one of the cakes come out clean. Remove from the oven and let them come to room temperature.
- Finish by filling and covering in chocolate: When the honey cakes have cooled, unmold, cut each one of them in half and spread dulce de leche on the cut part. Top with the other half and then dip each cake into tempered chocolate.
- Transfer the chocolate covered cakes to a parchment paper lined baking sheet so they can set.
- Enjoy!
Filling Suggestions for Pão de Mel
The most traditional are dulce de leche and brigadeiro. However, nowadays you can find fun versions, made with ingredients like coconut, strawberry, passion fruit, and many others.
You can also skip the filling and just serve the cakes covered in chocolate.
How to Temper Chocolate
There are several ways to temper chocolate and I would probably have to write 2000+ words if I were going to cover them all. Instead, I am going to teach you the method I use, which happens to be the less messy one.
But first things first…
Why do we temper chocolate?
Tempering chocolate is simply heating and cooling chocolate to stabilize it before using it to make candies and sweet treats. Tempered chocolate won’t easily melt on your fingers, snaps when you bite into it and looks smooth and glossy.
Do you absolutely need to temper chocolate to cover Brazilian honey cake? No. But they will look infinitely better if you do!
The seeding method
In this method, we melt two thirds of the chocolate to a certain temperature and then use the remaining chocolate to bring the temperature down.
Easy peasy right? Not so much. It is important to be precise so you don’t risk burning the chocolate and so you can keep the chocolate tempered while you work with it! I highly recommend investing in a kitchen thermometer, if you don’t already own one.
Here are the steps. I am only covering milk and dark/bittersweet chocolate, as that’s what you would use to cover pão de mel.
- Start by chopping or grating your chocolate.
- Place two-thirds of the chocolate in the top pan of a double boiler. You can also use a large bowl over a smaller sauce pan filled with barely simmering water. Stir constantly, checking the temperature, until the chocolate is melted and reaches 118°F for dark chocolate or 115°F for milk chocolate.
- Add the remaining chocolate, stirring until dissolved and cooled to a temperature of 88 – 89° F for dark chocolate or 84 – 86° F for milk chocolate. That could take anywhere from 10 to 15 minutes, depending on your room temperature. Your chocolate is now tempered and ready to be used.
Make sure to keep checking the temperature while you work with the chocolate, as the temperature shouldn’t drop too much or the chocolate will start to solidify.
If the temperature starts dropping, just pop the bowl back on top of the warm water to raise it back to the tempered temperature. Just remember that the temperature should never go above 90° F or you (and the chocolate) will lose your temper and have to start over again.
Also, keep water far away from your chocolate, as it causes it to seize and separate!
Spiced Honey Cakes – A chocolate gift everyone will love!
Pães de mel make great edible gifts! You can give them as party favors (like I did for my toddler’s birthday party), hostess gifts, Christmas, Valentine’s Day, and so many fun occasions. The spices in these treats make them great for the holidays!
You can put them in cute treat boxes or wrap in specialty cellophane bags that you can find at your local craft store!
For my daughter’s birthday, I stuck colorful straws in the center of the cakes, wrapped them in cello bags and decorated with bows and charming chalkboard stickers. They looked like giant lollipops and were a hit among the children and adults!
How long will Pão de Mel last?
These cakes, if covered in tempered chocolate, will last about 2 weeks if properly stored at room temperature and up to a month in the fridge! The freshest the better, though.
Can I freeze Brazilian Honey Cakes?
Yes, you can freeze them for up to 3 months! When ready to eat, thaw overnight in the fridge and let them come to room temperature before serving.
More Brazilian desserts:
- Traditional Brigadeiros
- Pudim (Brazilian Flan)
- Brigadeiro Cake
- Manjar Branco (Coconut Flan)
- Papaya Cream
- Strawberry Tartlets (Tortinha de Morango)
- Brazilian Carrot Cake

Brazilian Honey Cakes (Pão de Mel)
Ingredients
For the honey cakes:
- 1 1/4 cups whole milk
- 1 teaspoon cinnamon
- 1/2 teaspoon ground cloves
- 1/4 teaspoon freshly grated nutmeg
- 1 cup honey
- 5 eggs
- 1 1/2 cups brown sugar
- 1 tablespoon vanilla extract
- 1/2 teaspoon salt
- 2/3 cup vegetable oil
- 1/3 cup Dutch-process cocoa powder
- 1 teaspoon baking soda
- 1 teaspoon baking powder
- 3 cups all-purpose flour
For the dulce de leche filling:
- 1 1/2 cups dulce de leche
For covering with chocolate:
- About 30 ounces bittersweet chocolate, chopped
Equipment
Instructions
- Preheat oven to 350 degrees F. Grease and dust 24 4-ounce ramekins with cocoa powder. Reserve.
- Combine the milk, cinnamon, cloves and nutmeg in a small saucepan. Heat it, over medium heat, until it starts to simmer. Remove from heat and add the honey, stirring until the honey has dissolved. The milk fats might separate, that is ok. Cover and reserve until cooled to room temperature.
- Once the infused milk has cooled, transfer to the jar of a blender and add the eggs, brown sugar, vanilla extract, salt and vegetable oil. Blend until well combined.
- Pour the liquid mixture into a large bowl. Start adding the dry ingredients, sifting them into the bowl with the aid of a fine mesh sieve. Start with the cocoa powder, followed by baking soda, baking powder and flour. Whisk to combine, being careful not to overmix.
- Pour the batter into the prepared ramekins. Place them in baking sheets and bake until a toothpick inserted in the center of a cake comes out clean, 15-20 minutes.
- When cakes are done, remove from oven and let them cool. Then, run a butter knife along the circumference and unmold the cakes.
- Using a serrated knife, cut each cake in half. Spread about 2 tablespoons of dulce de leche in the cut side of one of the halves. Top with the second half, creating a sandwich. Repeat with all the cakes. Reserve.
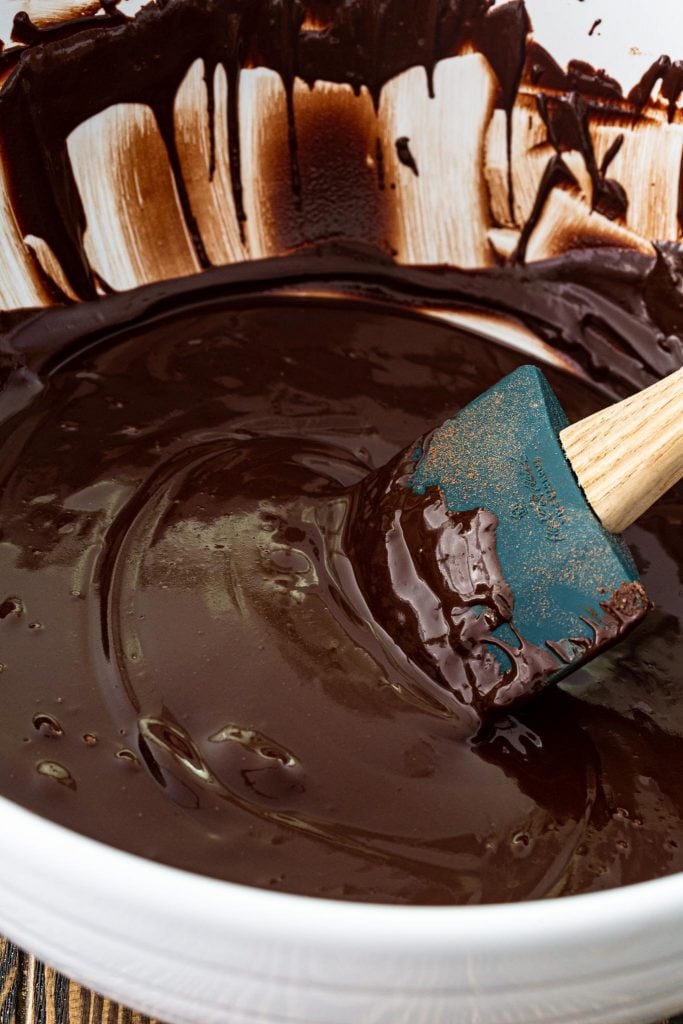
- Temper the chocolate: Place two-thirds of the chopped chocolate in the top pan of a double boiler or in a large bowl set over a smaller saucepan filled with barely simmering water. Stir constantly until the chocolate is melted and it reaches a temperature of 118°F (see notes). Remove from the double boiler and add the remaining chocolate, stirring until dissolved and cooled to a temperature of 88 – 89° F. That could take anywhere from 10 to 15 minutes. The chocolate is now tempered and ready to use.
- Dip each cake into the tempered chocolate, with the aid of two forks, and set them into parchment paper to set.
- Once set, enjoy right away or keep it in an airtight container at room temperature for about 2 weeks, in the fridge for up to one month or freeze for up to 3 months.
Notes
- Equipment – No ramekins? You can use two muffin tins instead.
- A kitchen thermometer is a must when tempering chocolate. You want to be precise with the temperatures.
- Temperature – If using milk chocolate, check the post for the tempering temperatures as they will be different.
- If the tempered chocolate temperature starts to drop, you can just set it over the saucepan with warm water and stir until it reaches the tempered temperature again. Don't let the temperature go above 90° F or you will lose your temper and have to start over again.
- Never let any water come in contact with the chocolate, or the chocolate will seize and separate.
- Some people use a heating pad around the bottom and sides of the chocolate bowl, to make sure the temperature doesn't drop too much. If you choose to do that, just make sure the temperature doesn't go past 90 degrees F.
- You can test your temper by spreading a small amount of the tempered chocolate on a plate or the counter. If the chocolate harden and is shiny, the chocolate is tempered. If that doesn't happen, repeat the tempering process.
- Leftover chocolate? You can let it harden and then cover and store at room temperature. Yo can re-temper it for up to 2 more times.
- Servings: This recipe makes 24 cakes if you use 4-ounce ramekins. The cakes are big and quite indulgent, so you could consider the serving size 1/2 cake, or even make them smaller.
Nutrition
Did you make my Brazilian Honey Cakes?
Make sure to post a photo on Instagram and tag me at @oliviascuisine! I’m always happy to see your creations.


7 Comments on “Brazilian Honey Cakes (Pão de Mel)”
Oi Olívia,
Eu acho que o pão de mel do Brasil é de origem alemã. Moro no Canadá e comprei uns cookies chamados Lebkuchen que é o gingerbread cookie Alemã. O gosto e a aparência (com cobertura de chocolate) é igualzinho aos pães de mel do Brasil. Como o Brasil teve uma grande imigração de alemães, acho que é bem possível a minha hipótese estar certa, né?
Um beijo querida. E parabéns pelo seu site maravilhoso.
I love this! The problem is that I’m a visual learner. Can you make a video of how to make it? That would be AMAZING!!! I’m so happy I found your website.
I have had the pao de mel many times, but never with a filling of any kind. For me it would be sweetness overkill and detract from the spicy flavors of the cake.
Since you are Brazilian, I wonder why you use the Spanish dulce de leche instead of the Brazilian doce de leite.
I will try your recipe as I do recall the flavor of these treats – never had it served as dessert, but rather as an accompaniment to afternoon tea or coffee. Thank you for posting this!
Oi Olivia!
Qual marca de farinha de trigo voce recomendaria para o Pao de Mel?A marca de doce de leite deve ser muito boa mesmo mas vi que algumas pessoas reclamam que o vidro chega quebrado e eles nao repõem…ruim isso….Voce recomenda outra?
Muito obrigada!
Abracao,Andreia Antunes
Oi Andreia, eu uso King Arthur ou Bob’s Red Mill. Pro Doce de Leite, gosto desse aqui: https://amzn.to/37mWkD1 (affiliate). Sempre peço e nunca chegou quebrado. :)
Hi Olivia!
If I was to make this recipe as one cake, which cake pan size would you recommend? Because I fear it won’t cook evenly if it’s too high. Thanks in advance.
Hi Eddie,
I believe the recipe would work in a 9X13 cake pan. If you’re worried the cakes would be too thick, you could divide the batter into two pans.